
Is Crazing driving you Crazy? (see what I did there 😉)
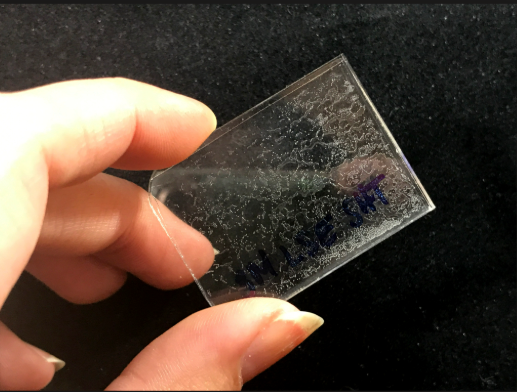
Is Crazing driving you Crazy? (see what I did there 😉) Previous Post Is Crazing driving you Crazy? (see what I did there 😉) May 4, 2026 I’m not sure if crazing is a British term… or if it’s just something my family made up at some point. Either way, it’s a topic that comes up in almost every Bootcamp -usually because delegates have seen it many times but never knew what it was called… or why it happens. So let’s clear it up. Crazing = micro‑cracks in the surface of acrylic caused by stress, chemicals, or heat. They don’t always break the material, but they do weaken it and make it look cloudy, cracked, or frosted. If you’ve ever made a beautiful acrylic plaque, placed it on the dispatch table for QC, and had it bounced because it’s suddenly covered in tiny cracks… Or worse – installed it, only for the client to call the next day saying it’s “cracked”… That’s crazing. And once it starts, you can’t fix it. It weakens the panel, makes illumination patchy, looks unsightly, and leads to premature failure. Why crazing happens (the real causes inside sign shops) 1. Solvent / Alcohol exposure Acrylic hates solvents, alcohols and harsh cleaners and extruded acrylic is especially vulnerable. Even a quick wipe with a rag that has alcohol on it can cause crazing if the sheet is under stress or has micro‑scratches. Cast acrylic is more stable BUT if the edges have been laser‑cut or flame‑polished those edges will crack instantly when exposed to solvents. 2. Stress from fabrication ▪️ Over‑tightened fixings ▪️ Poorly designed folds ▪️ Too much heat during bending Cast acrylic reduces the risk, but technique still matters. 3. UV + age Older acrylic (especially extruded) becomes brittle and far more prone to crazing. 4. Wrong adhesive Using the wrong glue, or too much solvent cement, can attack the surface and trigger crazing. So how do we prevent crazing (the part your team really needs) ▪️ Use cast acrylic for anything fabricated or lasered ▪️ Advise clients to clean signs with mild soapy water, not chemicals ▪️ Don’t overtighten fixings ▪️ Use adhesives designed specifically for acrylic ▪️ Let laser‑cut parts “rest” before assembly ▪️ Avoid exposing stressed acrylic to solvents We touch on these fundamentals in The First Drill and Signage Bootcamp, because crazing is one of those issues that quietly costs sign shops time, money, and reputation. If crazing (or any other fabrication mystery) is driving your team crazy, reach out. We can map out practical, confidence‑building training that helps your staff understand why things go wrong and not just how to fix them after the fact. Drop me an email – michelle@makeih.com Previous Post
The Sticky Stuff!
The Sticky Stuff! </h2 > Previous Post The Sticky Stuff! April 20, 2026 Let’s talk about the sticky stuff – adhesives. If there’s one topic that consistently causes headaches in sign and print, it’s adhesives. And I’ve yet to meet a company who won’t admit they’ve had at least one sign fall off a wall thanks to tape. And if they’re being really honest… they’ll also admit the tape wasn’t the problem. Because most failures come down to surface prep, substrate, weight, environment, and adhesive choice – not the tape itself. We’re a visual industry, so we naturally reach for the thinnest, cleanest-looking option. Usually a pressure-sensitive adhesive (PSA) – the kind we can apply to the back of acrylic and laser cut. And that’s fine… when the conditions are right. Where PSA works well • Stroke widths that aren’t too thin (laser cutting can dry out the adhesive) • Lightweight letters • Smooth, high–surface-energy substrates like plastics, glass, metals, and epoxy paints In those situations, PSA performs exactly as intended. Where PSA fails • Internal walls • Textured or uneven surfaces • Low–surface-energy paints • Heavier letters • Recently painted walls This is where adhesive choice becomes a science and where many teams underestimate what’s actually required. A quick breakdown of adhesive strength. These numbers tell the story: • PSA tapes: 1–10 PSA • Foam tapes: 200–500 PSA • Acrylic adhesives: 2,000–4,000 PSA When you compare them side by side, it becomes obvious why thin PSA struggles on anything other than a perfect surface. Surface prep: the step most people skip If you want a bond to hold, prep is non-negotiable: • Clean both the sign and the surface with a 50:50 mix of water and isopropyl alcohol • Let it dry completely • Apply the tape only once the surface is ready. Skipping this step is one of the most common reasons signs fail – especially on internal walls. Use a J roller – it makes a huge difference. Once the sign is fixed to the wall, adhesive specialists recommend using a J roller to apply firm, even pressure. Why? Because pressure helps the adhesive: • Settle into the tiny, invisible gaps on the surface • Increase the effective surface area • Create a stronger, more reliable bond It’s a simple step that dramatically improves performance. Painted walls: timing matters If you’re applying to a freshly painted wall, you need to wait at least 7 days before installing signage. Here’s why: Fresh paint continues to off gas as it cures. If you apply tape too soon, the adhesive bonds to the paint, not the wall. When the paint releases, the sign releases with it. Which leads to the next point… If a sign falls off, here’s how to diagnose the failure. If the sign is on the floor with paint stuck to the back: → The surface failed. The tape did its job – the paint didn’t. If the tape is still on the wall and the sign is on the floor: → Either the prep to the signboard failed or the tape failed. And in most cases, it’s the prep. If the sign + tape are on the floor together: → Again, prep to the wall failed or the tape – but almost always prep. Surface energy, contamination, moisture, dust, and paint curing are the usual culprits. How to store tapes properly. Adhesives are sensitive to environment. To keep them performing at their best: • Store tapes in a cool, dry place • Keep them sealed to prevent dust contamination • Avoid direct sunlight and heat sources • Use older stock first (adhesives age) • Keep rolls upright, not crushed under weight Good storage = consistent performance. And finally… bond strength takes time A tape bond doesn’t reach full strength immediately. It takes around 72 hours to reach maximum performance. So if you’re installing something heavy, textured, or high-value and relying on bond strength alone… you’re gambling. Why this matters This is the kind of detail that separates a smooth install from a callback, a happy client from a frustrated one, and a profitable job from a margin-eater. It’s also exactly the kind of thing we discuss in workshops – because even experienced teams often haven’t been taught the why behind adhesive choice. If you’re seeing failures, or you’re unsure which adhesive is right for which substrate, I’m always happy to talk through it. What’s the stickiest situation you’ve run into lately? Previous Post